SeeMail 3.0 for Macintosh
Welcome to SeeMail!
Here is information about SeeMail 3.0, the SeeMail User Manual, and FAQ's (frequently asked questions).
ABOUT SEEMAIL
SeeMail has been developed to add more depth, more meaning, and more fun to e-mail. We think it greatly enhances e-mail communication. Please feel free to e-mail us with your suggestions for new features or ideas on how you are using SeeMail.
SeeMail was developed by the founders of RealMedia Inc. of Boulder, Colorado. It was originally created as a better, less expensive way for RM President Jim Sherman to stay in touch with his son at college. It has since blossomed into an exciting and dynamic communications tool for people the world over.
ELECTRONIC USERS MANUAL
CONTENTS
Section 1
Section 2
Section 3
Section 4
Section 5
Section 6
Section 7
Section 8
Section 9
Section 10
Section 11
Section 12
Section 13
How to Contact Us.
1. INSTALLING SEEMAIL
|
| |
|
Section 1 | |
|
Section 2 | |
|
Section 3 | |
|
Section 4 | |
|
Section 5 | |
|
Section 6 | |
|
Section 7 | |
|
Section 8 | |
|
Section 9 | |
|
Section 10 | |
|
Section 11 | |
|
Section 12 | |
|
Section 13 | |
|
| |
1. INSTALLING SEEMAIL
1.1. Place the program into a new folder called SeeMail and place an alias in your applications folder.
1.2. If you want to take pictures make sure your QuickCam or other digital camera is properly attached to your computer (if the camera is not plugged in you will receive an error message but you will still be able to view, hear, import, and record new SeeMail messages).
Connectix users note: The color QuickCam plugs into the printer or modem serial port and the keyboard port. Make sure to replug the keyboard into the pass-through port of the QuickCam's plug. The black and white QuickCam has only one plug: into the modem or printer serial port. If you have questions refer to the QuickCam manual.
1.3. Start the SeeMail program by double-clicking on the icon. Go to the Preferences Tab and set up your preferences for using SeeMail. If you have a digital camera connected to your computer, select either the modem or the printer port.

1.4. Select the e-mail program you are using. If it isn't listed, choose "Other".
1.5. Complete setting up SeeMail by adjusting your video and audio settings.
1.5.1 Video Setting Suggestions:
These are preset to standard settings. Do not set your brightness level on automatic. Instead, adjust brightness directly from the SeeMail brightness control under the picture frame. It appears after you select "Compose Picture".
1.5.2 Audio Setting Suggestions:
a. Compression: none unless you are sure the recipient of your messages will be able to properly decompress. Windows machines don't 'know' about most of the compression settings of the Macintosh. Cross platform standards are still being settled. Therefore the best choice, for now, is to select none. This is the default for SeeMail.
b. Your audio sampling rate has a default setting of 11.025 kHz and in Mono to keep your SeeMail file sizes smaller.
2. CREATING A SEEMAIL STILL PICTURE
2.1. Select the "Create Still" tab. If you wish to create and send a still picture using a camera that is connected to your computer, go to step 2. If you wish to import an image, go to section 3, "Importing a Still Picture."

2.2. The right side of the SeeMail screen is where new SeeMail messages are created. The "thumbnail" picture to the left of the large screen displays the last SeeMail viewed. Underneath the large picture frame is the SeeMail control panel.
2.3. To take a picture, click once on Compose Picture. This activates your camera and allows you to frame your picture just the way you want it and to adjust the brightness. You'll notice that the Compose Picture button changes to Capture Picture.
2.4. Take your time and compose your shot. You'll notice the Brightness slider under the picture frame. Adjust this until you have attained the optimum brightness.
2.5. You're ready to shoot. To take a picture, click once on Capture Picture. You will hear the shutter go off. Voila! You have created a SeeMail photo! It is displayed in the frame above the controls.
2.6. Don't like it? No problem. You'll notice that as soon as you selected Capture Picture, the button returned to Compose Picture. To take another picture, click on Compose Picture and repeat the previous steps until you get the perfect shot.
3. IMPORTING A STILL PICTURE
If you wish to import both a still picture and an audio file, you must import the audio file first. See section 5, Importing Audio for Still Pictures.
3.1. After selecting the Create Still tab, you'll notice that underneath the Send button is a button called Import.
3.2. Click once on Import.
3.3. A Dialogue Box appears, which is usually your default file for storing images. If this is not the file you want, simply use the open and drag down selection at the top of the dialogue box to open the folder and file you are wishing to import.
3.4. Select the file you wish to import and click Open.
3.5. The selected file may need to be converted to a format that works with SeeMail. If this is the case, Open will change to Convert. Click on Convert and your image will be converted and placed in the SeeMail screen.
3.6. If you wish to add audio, you may record a voice message (see Recording Audio). If you wish to import an audio file, see Importing Audio Files.
Note If you do not wish to send audio with your picture, hit the record button once, and then click stop after a second. If you don't perform this operation, the last recorded or imported audio will be sent with your picture.
3.7. To send, read section 6, Sending a SeeMail.
4. RECORDING AN AUDIO MESSAGE FOR STILL PICTURES
4.1. You've created or imported a picture; now you can record a voice message if you wish. You'll notice that under the picture you just created is a speaker icon. Below it and to the right are two buttons: Play and Record.
If you do not wish to send audio with your picture, hit the record button once, and then click stop after a second. If you don't perform this operation, the last recorded or imported audio will be sent with your picture.
4.2. To record a message, click once on the Record button. You'll notice that this turns to Stop. That's so you won't have to move your mouse to stop your recording.
4.3. After you have selected Record, record your message.
4.4. When you have finished your recording, simply click the Stop button.
4.5. To listen to your recording, click on Play. (This also turns to Stop so you don't have to move your mouse.)
4.6. Don't like it? Again, it's no problem. Just clear your throat, rehearse your lines, select Record and repeat the previous steps.
5. IMPORTING AUDIO FOR STILL PICTURES
5.1. After selecting the Create Still tab, you'll notice that underneath the Send button is a button called Import.
5.2. Click once on Import.
5.3. A Dialogue Box appears, which is usually your default folder for storing files. If this is not the file you want, simply use the open and drag down selection at the top of the dialogue box to open the folder and file you are wishing to import.
5.4. Select the audio file you wish to import and click Open.
5.5. The selected file may need to be converted to a format that works with SeeMail. If this is the case, Open will change to Convert. Click on Convert and your sound file will be converted and placed in the SeeMail screen.
5.6. If you wish to add a picture, you may create an instant still picture using your digital camera, or you may import an image. (See Importing Still Pictures) If you do not wish to send audio with your picture, hit the record button once, and then click stop after a second. If you don't perform this operation, the last recorded or imported audio will be sent with your picture.
5.7. To send, read section 6, Sending a SeeMail Message.
6. SENDING A SEEMAIL MESSAGE
6.1. After you have created a picture and a sound recording, a video, or an audio only message that you would like to save and send, click on the Send button in the upper left hand corner the screen.
6.2. A "Save As" dialog box will appear. Insert your own filename in the space and be sure to know which folder you are saving the message into. We suggest you save the message using the name or initials of the person to whom you are sending the message. That way you'll be able to identify which SeeMails are which in your folder. Then click OK.
6.3. If you have chosen one of the e-mail programs in the Preferences dialog box SeeMail will automatically launch the e-mail program. In the case of Eudora, SeeMail will even attach the SeeMail message. If your e-mail program does not automatically launch, then launch it yourself, select "new message" and select the attachment option to manually attach the SeeMail you just created. Then you'll only have to insert the address, type your text message and send it!
7. VIEWING A SEEMAIL MESSAGE
Different e-mail programs have different ways of notifying you that you have received a SeeMail attachment. Some will download the attachment when they download the e-mail message and show the attachment as an icon. Attached files that end with ".mov" are SeeMails. Other e-mail programs, like America Online, will provide a screen that asks if you want to download the attached file. Just click yes and remember that the attached file will end up in your e-mail program's attachment folder. Refer to your e-mail program's manual or select HELP from your e-mail program if you have questions.
7.1. Usually when you receive a SeeMail attached to an e-mail you will see the attached file's icon and name ending with a ".mov" or sometimes with a ".qt". Simply double-click on it and it will open. Use the audio buttons at the bottom of the picture to hear the audio message.
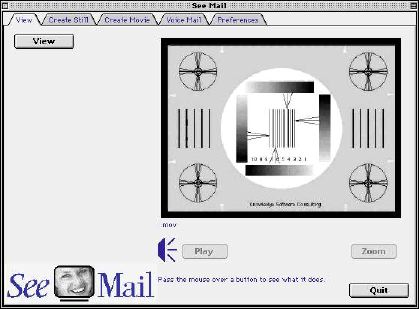
7.2. Another method to receive a SeeMail message is to start SeeMail, click on the View tab, and then the View button, and use the dialog box to find the received SeeMail file (usually in your e-mail program's Attachments or Downloads folder), and double-click on it. It will open on the left side of the SeeMail screen. Select the Zoom button if you want to view a full screen image. Click the Play button and listen to the audio message.
7.3. Use the View screen anytime you wish to look at your saved SeeMails.
8. CREATING A SEEMAIL MOVIE
8.1. Select the Create Movie tab.
Movies take up alot of room. We have tried to choose the best compressor that will work for all platforms. Still, a short video can run past 400kb very quickly. Keep this in mind when you create the movie and are planning to send it off to your friends.
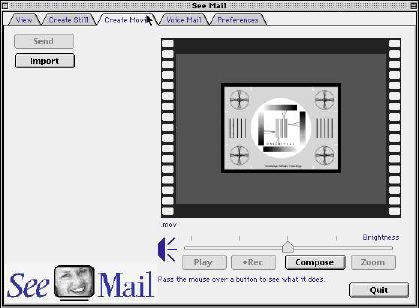
8.2 Hit the compose button, just as you did for the still image, you are now viewing a live image from your camera. YOU ARE NOT RECORDING, yet.
8.3 Adjust the sliding bar to adjust the brightness of the image. And frame your picture.
8.4 Then, press the Record button to record to start recording your video and voice message simultaeneously. You'll notice it turns to Stop after you begin recording. When you are done recording, simply press Stop.
8.5 After a moment for processing and encoding, you can play back your movie by press Play. This also turns to Stop as soon as you begin playing back.
8.6 Don't like it? No problem. Just hit Record again and do it over until you get it right.
8.7 If you want to see your movie in the full SeeMail frame, just hit Zoom.
8.8 When you are ready to send, hit the Send button and follow the steps in Section 6, Sending a SeeMail.
9. IMPORTING A MOVIE
9,1. After selecting the Create Movie tab, you'll notice that underneath the Send button is a button called Import.
9.2. Click once on Import.
9.3. A Dialogue Box appears, which is usually your default file for storing images. If this is not the file you want, simply use the open and drag down selection at the top of the dialogue box to open the folder and file you wish to import.
9.4. Select the file you wish to import and click Open.
9.5. The selected file may need to be converted to a format that works with SeeMail. If this is the case, Open will change to Convert. Click on Convert and your movie will be converted and placed in the SeeMail screen.
9.6 If you want to see your movie in the full SeeMail frame, just hit Zoom.
9.7 When you are ready to send, hit the Send button and follow the steps in Section 6, Sending a SeeMail.
10. RECORDING A VOICE MAIL MESSAGE
10.1 Select the Voice Mail tab.
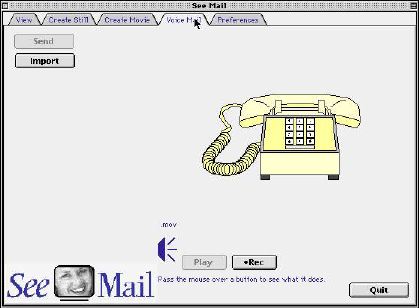
10.2 A SeeMail screen with a phone graphic appears. Underneath this image are two buttons, Play and Record.
10.3 To record a message, click once on the Record button. You'll notice that this turns to Stop. That's so you won't have to move your mouse to stop your recording.
10.4. After you have selected Record, record your message.
10.4. When you have finished your recording, simply click the Stop button.
10.5. To listen to your recording, click on Play. (This also turns to Stop so you don't have to move your mouse.)
10.6. Don't like it? Again, it's no problem. Just clear your throat, rehearse your lines, select Record and repeat the previous steps.
10.7 When you are ready to send, hit the Send button and follow the steps in Section 6, Sending a SeeMail.
11. IMPORTING AN AUDIO FILE FOR VOICE MAIL
11.1. After selecting the Voice Mail tab, you'll notice that underneath the Send button is a button called Import.
11.2. Click once on Import.
11.3. A Dialogue Box appears, which is usually your default folder for storing files. If this is not the file you want, simply use the open and drag down selection at the top of the dialogue box to open the folder and file you are wishing to import.
11.4. Select the audio file you wish to import and click Open.
11.5. The selected file may need to be converted to a format that works with SeeMail. If this is the case, Open will change to Convert. Click on Convert and your sound file will be converted and placed in the SeeMail screen.
11.6 Hit the Play button below the screen to hear your imported message. If you wish to change it, just hit Import again and redo these steps.
11.7. To send, read section 6, Sending a SeeMail Message.
12. DROP DOWN MENU COMMANDS
File Commands
File/New: re-opens SeeMail window when active
File/Open: brings a SeeMail into the Receive frame
File/Close: closes the SeeMail window but keeps it active; to re-open use
File/Save: saves latest created SeeMail message (right side frame)
File/Save As: saves latest created SeeMail message with new name
Page Setup: not currently implemented
Print: not currently implemented
Quit: Quits SeeMail program
Edit Commands
Edit/Undo: undoes last command when possible
Edit/Cut: removes SeeMail message from right side frame, can be pasted into another application
Edit/Copy: copies SeeMail message from right side frame, can be pasted into another application
Edit/Paste: pastes image or sound file copied from outside application into right side frame of SeeMail.
Edit/Clear: removes SeeMail message from right side frame
13. FREQUENTLY ASKED QUESTIONS
1) How do I send a SeeMail to someone without the SeeMail program?
ANSWER: Just do it!
SeeMail 3.0 for Mac compresses both picture and voice into a file that can easily be read by the Simple Text application which is included on all Mac's. You can even send SeeMail messages to folks who use PC's! We've made SeeMail cross platform by having it compress the message into a .mov file. This file can be read on a PC by Windows 95 Movie Player or Quicktime for Windows which is included with almost all multimedia ready PC's.
If a mac recipient of your SeeMail message has trouble opening the message, they may have a very early version of Simple Text, probably 1.1.1. All they have to do is go to the Apple web site -www.apple.com- and download the newest free version of Simple Text, 1.3 or newer. Make sure they delete the old version from their computer.
If a PC recipient of your SeeMail message has trouble opening it, all they need to do is go to the Apple web site -www.apple.com- and download the free version of Quicktime for their particular Windows platform. They will enjoy having it because it will greatly enhance their internet enjoyment and capabilities, not just SeeMail .
2. Can I view a SeeMail file while I am still in my e-mail program?
ANSWER: Yes
Just double-click on the SeeMail attachment you have received and it will automatically open for you. Double-click on the picture or use the audio play button under the picture and you will hear the voice message. You never need to leave your e-mail program.
3. After I have created my SeeMail message, can SeeMail launch my e-mail program automatically?
ANSWER: Yes!
When you first start SeeMail the Preferences dialog box will ask you which e-mail program you use. SeeMail currently works automatically with Eudora 3.0 or newer, Claris E-Mailer, Netscape, Cyberdog, and America Online. Choosing one of these will enable
SeeMail to automatically launch the program after you have created your SeeMail message.
Just attach the SeeMail, address the e-mail, type a text message if you like and send. It's that simple!
If you do not use one of these popular e-mail programs or if you do not want to automatically start your e-mail program upon creation of a SeeMail message, choose "Other" in the Preferences box. You then manually start your e-mail program and attach the SeeMail file.
How to Contact Us.
RealMedia Inc.
1020 Gale Ave.
Boulder, CO 80303
303.442.4512
Mail off a note to:
coseemail@aol.com
(PC)
brd@netone.com
(MAC)
Or visit our website at:
www.realmediainc.com